boxレイアウト flexbox

1
<script src="<?php echo get_stylesheet_directory_uri(); //flexbox?>/d/js/flexibility.js"></script>
1
2
3
4
5
6
<div class="frex_box">
 
要素
要素
要素
</div>

less

1
2
3
4
5
6
7
8
9
10
11
12
13
14
15
16
17
18
19
20
21
22
23
24
25
/*フレキシブル 高さ揃える*/
.frex{
    -js-display: flex;
    display:-webkit-box;
    display:-moz-box;
    display:-ms-box;
    display:-webkit-flexbox;
    display:-moz-flexbox;
    display:-ms-flexbox;
    display:-webkit-flex;
    display:-moz-flex;
    display:-ms-flex;
    display:flex;
    -webkit-box-lines:multiple;
    -moz-box-lines:multiple;
    -webkit-flex-wrap:wrap;
    -moz-flex-wrap:wrap;
    -ms-flex-wrap:wrap;
    flex-wrap:wrap;
    }
 
.frex_box{ width:100%;
         .frex;
    justify-content: flex-start;
    flex-wrap:wrap}

ブートcss モバイル

1
.frex_box{ max-width:300px; margin-left:auto; margin-right:auto}

http://liginc.co.jp/web/html-css/css/21024
ie8 対応 画像 縦のび backgroundSize

縦伸びは

1
2
max-width:〜;
width:auto; /* ie8 */

とする

backgroundSizeが使えない点は
そうしても対応できなかった

スライダーで

ただリビングみたら

画像サイズは小さかった
1100

1
2
3
4
5
6
7
<!--[if lt IE 8]>
<div class="ie_viewer">
<![endif]-->
 
<!--[if (gte IE 9) |!(IE)]><!-->
<div class="viewer">
<!--<![endif]-->

こう書くと分岐できるよいうだが めんどいのでやめ

SimpLESS 設定ファイル

/Users/doggstar/Library/Application Support/Titanium/appdata/com.wearekiss.simpless

更新して

/Users/doggstar/Library/Application Support/
内 lessで検索 更新順?変更順で発見

※simplessはファイルがなかったり プラグイン less css一覧画面に なかったりすると 更新できなくなるよ

flexbox

1
<script src="<?php echo get_stylesheet_directory_uri(); //flexbox?>/d/js/flexibility.js"></script>
1
2
3
4
5
.container {
-js-display: flex;
display: flex;
align-contents: stretch;
}

具体

1
2
3
.before_after_box{
    -js-display: flex;
     display: flex;

http://www.webcreatorbox.com/tech/ie8-flexbox/
http://www.webcreatorbox.com/tech/flexbox/
http://cosao.net/archives/8246

ワイドレスポンシブスライダのポイント

細かいのはソースを見てくれハウジング

ポイントは

画像は背景に設定

(ここは

1
align-items: center;

でいけたかも

あとは
画像を中心にしておおきくするにはなんとなくありだけど

文字がでかくなりすぎるので
小さくしなきゃいかんが

それじゃちいさすぎるで

もじだけうえからpngで重ねた

そんでmax-widhを設定してそれ以上おおきくせず

中心アプソルトで
ひだり3%でOK

1
2
3
4
5
6
7
8
9
/*追記文字 大きくなり過ぎないように*/
.sl_moji{max-width:1000px;
 position:absolute;
 top: 0;
    left: 3%;
     
    bottom:0;
    margin: auto;}
    /*ここだけ*/
1
2
3
4
5
6
7
8
9
10
11
12
<div class="viewer">
<ul>
 
<li class="sl3">
 
<!--*追記文字 大きくなり過ぎないように*-->
<img src="<?php echo get_stylesheet_directory_uri(); ?>/d/img/top-test4.png"    alt="エクステリア工事<?php include(get_stylesheet_directory() . "/d/word/5_shop_name.php") ?>|スライド画像1" class="sl_moji"/>
<!---->
 
<img src="<?php echo get_stylesheet_directory_uri(); ?>/d/img/sl_0.png"    alt="エクステリア工事<?php include(get_stylesheet_directory() . "/d/word/5_shop_name.php") ?>|スライド画像1" class="respo_img" />
 
</li>

保護中: nhk

このコンテンツはパスワードで保護されています。閲覧するには以下にパスワードを入力してください。

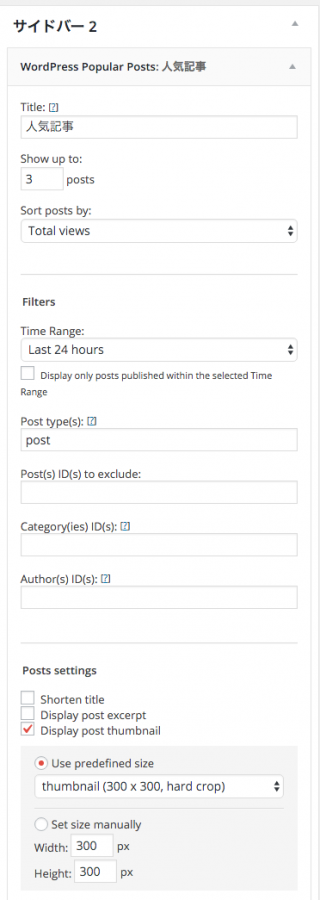
WordPress Popular Posts ライフで作成

うち山から引用

まずウィジェット

ファンク追加

1
2
3
4
//サイドバー使える様にする
if ( function_exists('register_sidebar') )
    register_sidebar();
    register_sidebar(2);

ウィジェット

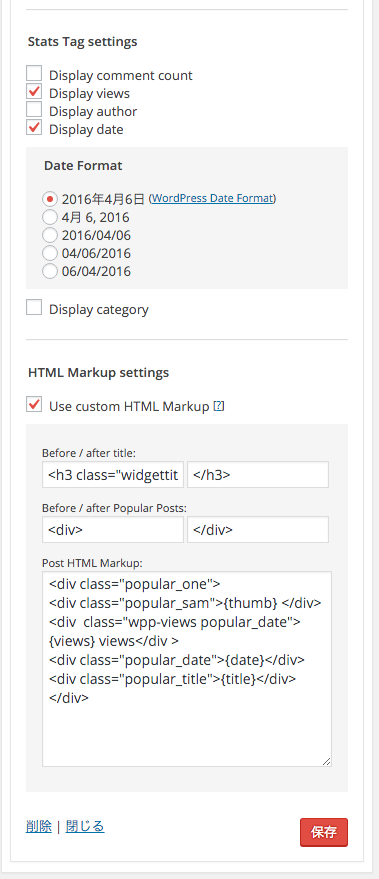
スクリーンショット 2016-04-06 20.06.44

スクリーンショット 2016-04-06 20.06.51

ポイントは
posted on|とかでるので
Stats
は表示せず
直接テンプレに書く

1
<h3 class="widgettitle"></div>
1
2
3
4
5
6
<div class="popular_one">
<div class="popular_sam">{thumb} </div>
<div  class="wpp-views popular_date">{views} views</div >
<div class="popular_date">{date}</div>
<div class="popular_title">{title}</div>
</div>

サイドバーに

1
<?php dynamic_sidebar(2);?>

cssは既存のうちのやつを改造

メイン

1
2
3
4
5
6
7
8
9
10
11
12
13
14
15
16
17
18
19
20
21
22
23
24
25
26
27
28
29
30
31
32
.popular-posts{}
.popular_one{
    margin-bottom: 8px;
    padding-bottom: 8px;
    border-bottom-width: 1px;
    border-bottom-style: dotted;
    border-bottom-color: #CCC;
    clear: both;
    overflow: hidden;
}
.popular_sam{
    float: left;
}
.popular_sam img{
    float: left;
    background-color: #FFF;
    padding: 1px;
    border: 1px solid #CCC;
    margin-right: 12px;
    width:120px;
    height:120px
}
.popular_date{
    font-size: 12px;
}
.popular_title{
    font-size: 16px;
}
 
.wpp-views{
    color: #FF7737;
}