.top_prof{ mini-width: 1084px; width: 90%; right:0; left:0; margin: auto;  position: absolute;bottom: 0; color: #fff; padding: 24px; background-color: rgba(0,0,0,0.3) ;

p.pc_bio{display: block;}
p.note_bio{display: none;}
p.mob_bio{display: none;}
}


@media screen and (max-width: 736px) {


	.d_con_rela{position: relative;
	.top_bg2{.d_con_width{position:inherit;}}

	}

	.top_prof p.pc_bio {display: none;}
	.top_prof p.note_bio{display: none;}
	.top_prof p.mob_bio {display: block;}

}

@media screen and (max-height: 900px) and (min-width: 737px) {
   /* 高さ900px以下の場合 */

	.top_prof p.pc_bio {display: none;}
	.top_prof p.note_bio{display: block;}
	.top_prof p.mob_bio {display: none;}
}
ファルコン 高さ100%のレイアウトで その後、fixedがでてくる方法
<?php if(is_home()): //topのみフル画面でメニュー出現?>
<script>
(function($) {
    $(function() {
        var $header = $('body');
        $(window).scroll(function() {

			 var w = $(window).width();
			var h = $(window).height();
    var x = 784;


            if ($(window).scrollTop() > h) {
                $header.addClass('fixed');

				  // くっつきメニューのの高さを取得し、変数に格納
  var h = $('.fixed .header2').height();

$('.top_membder .membder_box').css('top',h);


            } else {
                $header.removeClass('fixed');

				  // くっつきメニューのの高さを取得し、変数に格納
  var h = $('.fixed .header2').height();

$('.top_membder .membder_box').css('top',h);


            }


        });
    });
})(jQuery);
</script>

<?php else: //それ以外はヘッダーの高さで出現//モバイル分岐いらんかぁ?>

<script>
(function($) {
    $(function() {
        var $header = $('body');
        $(window).scroll(function() {

			 var w = $(window).width();
			var h = $(window).height();
    var x = 784;

    if (w <= x) {$ddd = $('.header2').height();}
			else {$ddd = $('.header2').height();}

            if ($(window).scrollTop() > $ddd) {
                $header.addClass('fixed');
            } else {
                $header.removeClass('fixed');
            }


        });
    });
})(jQuery);
</script>

<?php endif; ?>
テーマフォルダへのアプローチ 固定ページ ページテンプレート
固定ページ ページテンプレート は一階層目までしか読まない
昔なぜやめたかは、インクルードにて、wp テンプレートディレクトリを使っていなかったから
sting welcart 発売日 アーティスト 表示オプション消える件 でやっても効果なかったが、 管理画面にJクエリで チェックボックスを強制にチェックさせる
ファンクション
//管理画面に任意のjs
//function my_jquery($hook) {
//	//if($hook == 'edit.php'){
//  	wp_enqueue_script('custom_admin_script', get_bloginfo('template_url').'/d_admin/my_jquery.js', array('jquery'));
//	//}
//}
//add_action('admin_enqueue_scripts', 'my_jquery');
my_jquery.js
(function($) {
 $(document).ready(function(){
    //Write jQuery script here
  // alert('hoge');

//	 $('[name="artistdiv-hide"]').prop('checked',false);
//	 $('[name="artistdiv-hide"]').prop('checked',true);
 });
})(jQuery);
https://qiita.com/i47_rozary/items/db77352cc0af8d05d39a
https://www.p-nt.com/technicblog/archives/82
https://techacademy.jp/magazine/9494
sting welcart 発売日 アーティスト 表示オプション消える件
/*welcartのアーティスト 発売日消えるので 強制表示*/
/*
.post-php #artistdiv,
.post-new-php #artistdiv,
*/
.welcart-shop_page_usces_itemnew #artistdiv,
.welcart-shop_page_usces_itemedit #artistdiv,
.welcart-shop_page_usces_itemnew #smart-cf-custom-field-10260,
.welcart-shop_page_usces_itemedit #smart-cf-custom-field-10260
{display: block!important}
/*ブログにはいらない*/
/*発売日*/
.post-php #smart-cf-custom-field-10260,
.post-new-php #smart-cf-custom-field-10260,

/*ブログのアーティスト*/
.post-php #artistdiv,
.post-new-php #artistdiv,

/*タグ・シンプルタグ*/
/*おすすめ*/
#advanced-sortables #suggestedtags,
#simpletags-settings,
/*ウェルのタグ*/
.welcart-shop_page_usces_itemedit #advanced-sortables #st-clicks-tags,
.welcart-shop_page_usces_itemnew #advanced-sortables #st-clicks-tags,
.welcart-shop_page_usces_itemedit  #adv-tagsdiv,
.welcart-shop_page_usces_itemnew #adv-tagsdiv


/*表示オプション*/
,#contextual-help-link-wrap,
#screen-options-link-wrap


{display: none;}
WP-Members 色々 アドミンバー等の項目を削除する
http://www.wp-tech.net/wordpress_tips/2557/
チェックボックス判断
<?php if (get_post_meta($post->ID, '_wpmem_block', true)) : ?>
<br />
<?php if (have_posts()) : ?><br />
    <?php while (have_posts()) : the_post(); ?><br />
        <?php if (is_user_logged_in()) : ?><br />
        <!--ログインしてる時の内容--><br />
        <?php else ://ログインしてない場合 ?><br />
            <?php if (get_post_meta($post->ID, '_wpmem_block', true)) : ?><br />
            <!--ログインしていなくてチェックが入っている時の内容--><br />
            <?php else ://チェックしてない場合 ?><br />
            <!--ログインしていなくてチェックが入っていない時の内容--><br />
            <?php endif; ?><br />
    <?php endwhile; ?><br />
<?php endif; ?><br />
管理バーの項目を削除する
wpcj.net/260
/**
 * 管理バーの項目を削除します。
 */
function remove_bar_menus( $wp_admin_bar ) {
    $wp_admin_bar->remove_menu( 'wp-logo' );      // ロゴ
    $wp_admin_bar->remove_menu( 'site-name' );    // サイト名
    $wp_admin_bar->remove_menu( 'view-site' );    // サイト名 -> サイトを表示
    $wp_admin_bar->remove_menu( 'dashboard' );    // サイト名 -> ダッシュボード (公開側)
    $wp_admin_bar->remove_menu( 'themes' );       // サイト名 -> テーマ (公開側)
    $wp_admin_bar->remove_menu( 'customize' );    // サイト名 -> カスタマイズ (公開側)
    $wp_admin_bar->remove_menu( 'comments' );     // コメント
    $wp_admin_bar->remove_menu( 'updates' );      // 更新
    $wp_admin_bar->remove_menu( 'view' );         // 投稿を表示
    $wp_admin_bar->remove_menu( 'new-content' );  // 新規
    $wp_admin_bar->remove_menu( 'new-post' );     // 新規 -> 投稿
    $wp_admin_bar->remove_menu( 'new-media' );    // 新規 -> メディア
    $wp_admin_bar->remove_menu( 'new-link' );     // 新規 -> リンク
    $wp_admin_bar->remove_menu( 'new-page' );     // 新規 -> 固定ページ
    $wp_admin_bar->remove_menu( 'new-user' );     // 新規 -> ユーザー
    $wp_admin_bar->remove_menu( 'my-account' );   // マイアカウント
    $wp_admin_bar->remove_menu( 'user-info' );    // マイアカウント -> プロフィール
    $wp_admin_bar->remove_menu( 'edit-profile' ); // マイアカウント -> プロフィール編集
    $wp_admin_bar->remove_menu( 'logout' );       // マイアカウント -> ログアウト
    $wp_admin_bar->remove_menu( 'search' );       // 検索 (公開側)
}
add_action('admin_bar_menu', 'remove_bar_menus', 201);
WordPressの管理バーをカスタマイズしてオリジナルのメニューを加える方法
管理バーの右側をログアウトのみにする wpcj.net/483
/**
 * 管理バーの右側をログアウトのみにします。
 */
function admin_bar_right_logout( $wp_admin_bar ) {
	// マイアカウントを削除
	$wp_admin_bar->remove_menu( 'my-account' );
	// ログアウトを追加
	$wp_admin_bar->add_menu( array(
		'id'    => 'mylogout',
		'title' => __( 'Log Out' ),
		'href'  => wp_logout_url(),
		'meta'   => array(
			// ab-top-secondary = 右側表示。何も指定しない場合は左側
			'class' => 'ab-top-secondary',
		),
	) );
}
add_action('admin_bar_menu', 'admin_bar_right_logout', 201);
結局
//アドミンバー
add_action('admin_bar_menu', 'customize_admin_bar_menu', 9999);

function customize_admin_bar_menu($wp_admin_bar){
	$current_user = wp_get_current_user(); //現在のユーザー情報を取得
	 if(check_user_role($current_user,'subscriber')){//購読者
	    // Adminバー左側
    $wp_admin_bar->remove_node('wp-logo');     // 一番左のWordPressのロゴを消す。
    //$wp_admin_bar->remove_node('site-name');   // 左から2番めのサイト名を消す。
    $wp_admin_bar->remove_node('new-content'); // 「+ 新規」ってメニューを消す。

    // Adminバー右側
    //$wp_admin_bar->remove_node('my-account'); // アカウントのメニューを消す。
    $wp_admin_bar->remove_node('search');     // 検索のメニューを消す。
	$wp_admin_bar->remove_node('edit-profile'); // プロフィール編集
	$wp_admin_bar->remove_node('user-info'); //
	$wp_admin_bar->remove_menu( 'dashboard' );
	$wp_admin_bar->remove_menu( 'site-name' );    // サイト名
		 $wp_admin_bar->remove_menu( 'my-account' );   // マイアカウント

		 // ログアウトを追加
	$wp_admin_bar->add_menu( array(
		'id'    => 'mylogout',
		'title' => __( 'Log Out' ),
		'href'  => wp_logout_url(),
		'meta'   => array(
			// ab-top-secondary = 右側表示。何も指定しない場合は左側
			'class' => 'ab-top-secondary',
		),
	) );


	 }

}


//WP-Members
// 管理バーを非表示にする
//add_filter( 'show_admin_bar', '__return_false' );
// 会員を管理画面に入れない
function subscriber_go_to_home( $user_id ) {
$user = get_userdata( $user_id );
if ( !$user->has_cap( 'edit_posts' ) ) {
wp_redirect( get_home_url() );
exit();
}
}
add_action( 'auth_redirect', 'subscriber_go_to_home' );
   <a href="<?php the_permalink(); ?>" class="kanin_rela">
  <?php if (get_post_meta($post->ID, '_wpmem_block', true)) : ?>
   <?php if (!is_user_logged_in()) : ?>
	   <div class="kanin_gentei_sam"><div class="kanin_gentei"><span>会員限定記事</span></div></div>
	   <?php endif; ?>
<?php endif; ?>
アドバンスカスタムフィールドで日付から曜日(英字表記)
  <?php
	 $sche_date_base = get_field('schedule_day');
    $sche_date = date_create($sche_date_base);
    //echo date_format( $sche_date,'m/d');
    echo date_format( $sche_date,'Y.m.d');

//曜日割り出し
$datetime = date_create($sche_date_base);
$week = array("日", "月", "火", "水", "木", "金", "土");
$week = array("SUN", "MON", "TUE", "WED", "THU", "FRI", "SAT");
$w = (int)date_format($datetime, 'w');
 //echo '(' . $youbi = $week[$w].')';
echo ' (' . $youbi = $week[$w].')';
?>
参考
これもみつけたkど
スケジュール 過去・今日・未来 アーカイブでcss分岐 宇宙船演算子
            <?php
$sche_date = date_create(get_field('schedule_day'));//スケジュールDAY
$sche_date = date_format( $sche_date,'Ymd');///スケジュールDAY

$today = date("Ymd");//今日

//    	echo "<pre>";
//	print_r($today);
//	echo "</pre>";
//    	echo "<pre>";
//	print_r($sche_date);
//	echo "</pre>";

if(($today <=> $sche_date) == 1){$sche_date_css = 'kako_suke';}//過去
elseif(($today <=> $sche_date) == -1){$sche_date_css = 'mirai_suke';}//未来
elseif(($today <=> $sche_date) == 0){$sche_date_css = 'kyou_suke';}//今日

//echo $sche_date_css;
?>
<article class="blog_new_kijibox <?php echo $sche_date_css;?>">
参考
http://php.net/manual/ja/language.operators.comparison.php
<?php
$a = 10;
$b = 100;

if (($a <=> $b) == 0) {
  echo '$aと$bは一致する';
} elseif (($a <=> $b) == 1) {
  echo '$aは$bより大きい';
} elseif (($a <=> $b) == -1) {
  echo '$aは$bより小さい';
}
?>
wp_list_categories にクラス get_terms current-cat
 <ul class="li_menu_ul">

<?php
$terms = get_terms('schedule_year');
foreach ($terms as $term ) {
//カレントカテのために追加
$term_id = $term->term_id;//現在のタームID
$taxonomy_name =	get_query_var('taxonomy');//現在のタクソノミー名
$current_calss = '';//カレント空に
if(is_tax($taxonomy_name , $term_id))://なら
$current_calss = ' current-cat';
endif;//おわり
  $des_list .= '<li class="des-'. $term-> slug . $current_calss .'">';
  $des_list .= '<a href="' . get_term_link( $term ) . '" class="f_button">';
  $des_list .= $term->name . '</a></li>';
}
echo $des_list;
?>
  </ul>

  <!--2個めは $des_list2 -->

    <ul class="li_menu_ul">

<?php
$terms = get_terms('schedule_cat');
foreach ($terms as $term ) {
//カレントカテのために追加
$term_id = $term->term_id;//現在のタームID
$taxonomy_name =	get_query_var('taxonomy');//現在のタクソノミー名
$current_calss = '';//カレント空に
if(is_tax($taxonomy_name , $term_id))://なら
$current_calss = ' current-cat';
endif;//おわり
  $des_list2 .= '<li class="des-'. $term-> slug . $current_calss .'">';
  $des_list2 .= '<a href="' . get_term_link( $term ) . '" class="f_button">';
  $des_list2 .= $term->name . '</a></li>';
}
echo $des_list2; ?>
  </ul>
参考
https://wpdocs.osdn.jp/%E9%96%A2%E6%95%B0%E3%83%AA%E3%83%95%E3%82%A1%E3%83%AC%E3%83%B3%E3%82%B9/is_tax
保護中: 電話をかける トラッキングコード
保護中: コンタクトフォーム 送信完了ページ
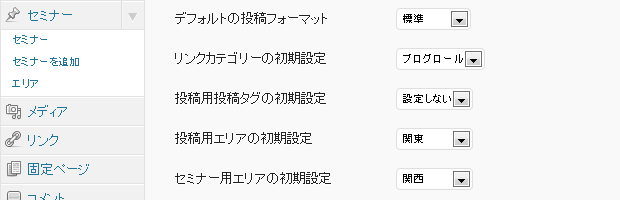
タクソノミーにブログのようにデフォルトをつけれるファンクション
//http://www.warna.info/archives/678/
//カスタムタクソノミーにデフォルトを設定
function add_default_term_setting_item() {
    $post_types = get_post_types( array( 'public' => true, 'show_ui' => true ), false );
    if ( $post_types ) {
        foreach ( $post_types as $post_type_slug => $post_type ) {
            $post_type_taxonomies = get_object_taxonomies( $post_type_slug, false );
            if ( $post_type_taxonomies ) {
                foreach ( $post_type_taxonomies as $tax_slug => $taxonomy ) {
                    if ( ! ( $post_type_slug == 'post' && $tax_slug == 'category' ) && $taxonomy->show_ui ) {
                        add_settings_field( $post_type_slug . '_default_' . $tax_slug, $post_type->label . '用' . $taxonomy->label . 'の初期設定' , 'default_term_setting_field', 'writing', 'default', array( 'post_type' => $post_type_slug, 'taxonomy' => $taxonomy ) );
                    }
                }
            }
        }
    }
}
add_action( 'load-options-writing.php', 'add_default_term_setting_item' );


function default_term_setting_field( $args ) {
    $option_name = $args['post_type'] . '_default_' . $args['taxonomy']->name;
    $default_term = get_option( $option_name );
    $terms = get_terms( $args['taxonomy']->name, 'hide_empty=0' );
    if ( $terms ) :
?>
    <select name="<?php echo $option_name; ?>">
<option value="0">設定しない</option>
<?php foreach ( $terms as $term ) : ?>
<option value="<?php echo esc_attr( $term->term_id ); ?>"<?php echo $term->term_id == $default_term ? ' selected="selected"' : ''; ?>><?php echo esc_html( $term->name ); ?></option>
<?php endforeach; ?>
    </select>
<?php else: ?>


<?php echo esc_html( $args['taxonomy']->label ); ?>が登録されていません。

<?php endif; } function allow_default_term_setting( $whitelist_options ) { $post_types = get_post_types( array( 'public' => true, 'show_ui' => true ), false );
    if ( $post_types ) {
        foreach ( $post_types as $post_type_slug => $post_type ) {
            $post_type_taxonomies = get_object_taxonomies( $post_type_slug, false );
            if ( $post_type_taxonomies ) {
                foreach ( $post_type_taxonomies as $tax_slug => $taxonomy ) {
                    if ( ! ( $post_type_slug == 'post' && $tax_slug == 'category' ) && $taxonomy->show_ui ) {
                        $whitelist_options['writing'][] = $post_type_slug . '_default_' . $tax_slug;
                    }
                }
            }
        }
    }
    return $whitelist_options;
}
add_filter( 'whitelist_options', 'allow_default_term_setting' );


function add_post_type_default_term( $post_id, $post ) {
    if ( ( defined( 'DOING_AUTOSAVE' ) && DOING_AUTOSAVE ) || $post->post_status == 'auto-draft' ) { return; }
    $taxonomies = get_object_taxonomies( $post, false );
    if ( $taxonomies ) {
        foreach ( $taxonomies as $tax_slug => $taxonomy ) {
            $default = get_option( $post->post_type . '_default_' . $tax_slug );
            if ( ! ( $post->post_type == 'post' && $tax_slug == 'category' ) && $taxonomy->show_ui && $default && ! ( $terms = get_the_terms( $post_id, $tax_slug ) ) ) {
                if ( $taxonomy->hierarchical ) {
                    $term = get_term( $default, $tax_slug );
                    if ( $term ) {
                        wp_set_post_terms( $post_id, array_filter( array( $default ) ), $tax_slug );
                    }
                } else {
                    $term = get_term( $default, $tax_slug );
                    if ( $term ) {
                        wp_set_post_terms( $post_id, $term->name, $tax_slug );
                    }
                }
            }
        }
    }
}
add_action( 'wp_insert_post', 'add_post_type_default_term', 10, 2 );
welacrt sonypayment ソニーペイメント どうだったか 流れ
まず問い合わせ、 会社が契約
テスト環境が送られてくる
【e-SCOTT_Smart_light_for_Welcart】加盟店接続情報【 】.xlsx
設定して
御社購入テスト
カード決済販売テスト
御社カード決済の管理画面等チェック
自動メール等の設定
メール配信方法など購入後のフロー確認
セキュリティ上 グローバルIPを設定
インフォメーションとブログの修正
まずインフォのコード修正
d_roop/
a_info1.php
        <?php
 // カテゴリー情報を取得

foreach( ( get_the_category() ) as $category ):
	$cat_name ='';//子
	$cat_name2 ='インフォメーション';//親
		if($category -> parent  ==  30 ){$cat_name = $category -> name;}
	if($category -> term_id  ==  30 ){$cat_name2 = 'インフォメーション';}
endforeach;


//		echo "<pre>";
//	print_r($cat_name);
//	echo "</pre>";


//$info_cat = get_the_category();
//	echo "<pre>";
//	print_r($info_cat);
//	echo "</pre>";
//
//
//$info_cat1 = $info_cat[1]; // 0が親11がその子・・ファンクションの並び順をオーダー通りに出力のおかげ
//$cat_name = $info_cat1->cat_name;
//
//$info_cat2 = $info_cat[0]; //
//$cat_name2 = $info_cat2->cat_name;
?>
そしてカテゴリ
ブログ一覧に表示しない
を作成 IDを把握
fanction/
admin_site.php
$info_cat_outを修正
//インフォカテゴリ
$info_cat= '30';
$info_cat_out= '-283';//任意
ループコード等修正
アーカイブ
<?php
if ( have_posts () ) :
    while ( have_posts() ) :
        the_post();
?>


//ここの分岐を削除
<?php include(get_stylesheet_directory() . "/roop_blog.php"); ?>


            <?php
    endwhile;
		else:?>
    <div class="top_set"><div style="font-size:12px; color:#CCC; padding-top:10px;">※記事はまだありません。</div></div>
	<?php
endif;
?>
blog topなど
$info_cat_outを利用していないなら
変更
<?php query_posts('post_type=post&cat='.$info_cat_out.'&paged='.$paged); ?>
スマホ PC スライダー 画像 変更 スライダーC
CSSのみで変更可能
スマホサイズは
背景画像変更
@media screen and (max-width: 736px) {
.sl1{
	background-image: url(/wp-content/themes/D/d/img/slider/slide1s.jpg);
	}

	.sl2{
	background-image: url(/wp-content/themes/D/d/img/slider/slide2s.jpg);
	}
}

@media screen and (max-width: 736px) {
/*	スマホ別画像 */
#main_contents_top_fade:before,
.viewer ul:before {
	    padding-top: 61%; /* 1200で400の高さ */
}

}
ちなみにこの場合は
スマホ
542 × 333
タグの数を指定して、それ以上だとmore..で表示する。
https://teratail.com/questions/30219
$posttags = get_the_tags();
$count=0;
if ($posttags) {
  foreach($posttags as $tag) {
    $count++;
    if ($count > 3) break;
    echo '<a href="'. get_tag_link($tag->term_id) .'">'. $tag->name .' ('. $tag->count .")</a>\n";
  }
}
を参考
<div style="margin-bottom:-44px; padding-top:44px; font-size:12px;" class="d_tag">


 <?php
 $posttags = get_the_tags();
$count=0;
if ($posttags) {
  foreach($posttags as $tag) {
    $count++;
    if ($count == 42) : echo'<span class="tag_close">More..</span><div class="tag_close_con">'; endif;
    echo '<a href="'. get_tag_link($tag->term_id) .'">'. $tag->name
		//.' ('. $tag->count
		."</a>
	";


  }
	  if ($count >= 42) : echo'</div>'; endif;
}

?>

  <?php// the_tags('タグ : ',' '); ?>
</div>
//ブログ シングル
	.d_tag{
a ,.tag_close{
 font-size: 10px !important; /* 文字のサイズ */
 line-height: 1em;
 background: #ccc; /* 背景色 */
 color: #fff; /* 文字色 */
 display: inline-block;
 white-space: nowrap;
 padding: 8px 8px; /* 文字周りの余白 */
 margin-top: 3px; /* タグ同士の余白 */
 border-radius: 4px; /* 角を少し丸く */
 text-decoration: none;
}
a:hover ,.tag_close:hover{
 background: #f9d635; /* マウスホバー時の背景色 */
 color: #2098a8; /* マウスホバー時の文字色*/
}

	a:before {
font-family:'fontello';
content: '\e856';
 padding-right: 4px;
}

	.tag_close{
	cursor: pointer; display: inline-block;}
	.tag_close_con{display: none;}
	}
こいつはヘッダーに
roopに入れると記事全部読むでオープン・クローズが繰り返される
<!--タグのmore-->
 <script>
	$(function(){
		$(".tag_close").on("click", function() {
			$(this).next().slideToggle();
		});
	});
</script>
CSSで色を直接書かず、変化量で相対的に指定する方法 RGBA 透明
https://allabout.co.jp/gm/gc/396829/3/
@f1_main_menu2rga:rgba(0,66,144,1.00);

	border-right: solid 1px fadeout(@f1_main_menu2rga, 80%);
welcart のパンくずで sting で沢山ですぎていらないといわれたやつ
2019改造
<div id="top_navi">
<?php
//記事中のすべてのカテゴリを取得
$categories = get_the_category();


//      echo
// "<pre>";
//  print_r($categories);
//  echo "</pre>";

//フォーチ 連多次元想配列  並び替え---------
//ソート用の配列を下準備
$amounts = array();
foreach($categories as $key):
    $amounts[] = $key -> parent;
    //$amounts[] = $key['name'];
endforeach;

//  連多次元想配列 並び替え
array_multisort($amounts, SORT_ASC, SORT_STRING, $categories);

//      echo
//  "<pre>";
//  print_r($amounts);
//  echo "</pre>";

//カテゴリがある場合の実行
if ( $categories ) {

  //カテゴリの数だけ繰り返す
  foreach( $categories as $category ) :


    //カテゴリを親まで辿って表示
      //商品を表示させないためファンクションで作成したget_category_parentsの変形 2019??

//2019追記

//	      echo
//  "<pre>";
//  print_r($category);
//  echo "</pre>";
// 商品 と ジャンルのパンくずを消す
	if( $category->term_id !== $welcart_cat && $category->term_id !== $welcart_genre ) :


      ?>
<div>
      <?php echo my_category_parents($category->cat_ID,true," > ");

    ?>
       </div>

      <?php
	endif;
	endforeach; } ?>
</div>
ファンクも改造
//パンくずに仕様 get_category_parentsでは商品がでてしまうのでコレを作る
function my_category_parents( $id, $link = false, $separator = '/', $nicename = false, $visited = array() ) {
    $chain = '';
    $parent = &get_category( $id );
    if ( is_wp_error( $parent ) )
        return $parent;

    if ( $nicename )
        $name = $parent->slug;
    else
        $name = $parent->name;

    if ( $parent->parent && ( $parent->parent != $parent->term_id ) && !in_array( $parent->parent, $visited ) ) {
        $visited[] = $parent->parent;
        $chain .= my_category_parents( $parent->parent, $link, $separator, $nicename, $visited );
    }


	//除外したいカテゴリIDを入れる
	global $welcart_cat;//関数内でグローバル変数を使いたいので呼び出す
	//global $welcart_genre;//関数内でグローバル変数を使いたいので呼び出す

    if ( ! in_array( $parent->term_id, array( $welcart_cat,1 ) ) ) {
        if ( $link )
            $chain .= '<a href="' . get_category_link( $parent->term_id ) . '" title="' . esc_attr( sprintf( __( "View all posts in %s" ), $parent->name ) ) . '">'.$name.'</a>' . $separator;
        else
            $chain .= $name.$separator;
    }
    return $chain;
}
htaccessで ブラウザのキャッシュの時間を調整する
<ifModule mod_expires.c>
ExpiresActive On
ExpiresDefault "access plus 30 minutes"
ExpiresByType text/html "access plus 10 seconds"
ExpiresByType text/css "access plus 10 seconds"

ExpiresByType image/jpg "access plus 7 days"
ExpiresByType image/jpeg "access plus 7 days"
ExpiresByType image/gif "access plus 7 days"
ExpiresByType image/png "access plus 7 days"

ExpiresByType application/pdf "access plus 1 month"
ExpiresByType text/x-javascript "access plus 1 month"
ExpiresByType application/javascript "access plus 7 days"
ExpiresByType application/x-javascript "access plus 1 month"
ExpiresByType application/x-shockwave-flash "access plus 1 month"
ExpiresByType image/x-icon "access plus 1 month"
</ifModule>
welcart Top カテゴリ 記事一覧などで役立つコード リンク先
  <?php
	$dslug = $dterm -> slug;
	//echo $dslug;
	$term_link = get_term_link($dslug,category);
	//print_r($term_link)
	//----------------------カテゴリタイトル-----------------------------
	//カウントで分岐もできるな
//	$dcount = $dterm -> count;
//	echo $dcount;
	?>

		    <div class="tsuzuki_box">
    <a href="<?php echo $term_link; ?>" class="link_all link_bottan" style=" font-size:13px;"><?php echo $dterm -> name; ?> ▶▶</a>
    </div>
ループ内